
How to Shoot a Wedding in Harsh Sunlight: Golden Hour & Midday Photography Tips
Let’s be honest — no wedding photographer books a job hoping for blinding midday sun beating down on the ceremony. But here’s the truth: harsh sunlight is not your enemy. It’s just an obstacle you haven’t fully learned to work with yet. Whether you’re battling a 1 p.m. outdoor ceremony with zero shade or chasing the last sliver of golden hour before it disappears behind the treeline, knowing how to shoot a wedding in harsh sunlight separates the professionals from the people who just got lucky with clouds. In this guide, you’ll get real, field-tested techniques — specific camera settings, light-shaping strategies, and compositional tricks — that work when the sun refuses to cooperate. Think of this as the conversation you’d have with a seasoned second shooter before walking into the toughest lighting situation of the season.
1. Understanding Why Harsh Sunlight Is Actually a Tool
Harsh sunlight creates hard, directional light with deep shadows — and once you understand its physics, you can manipulate it deliberately instead of running from it.
Most photographers fear midday sun because it produces unflattering shadows under eyes, noses, and chins — what pros call “raccoon eyes.” It blows out highlights on white wedding dresses and creates squinting subjects. But here’s the flip side: that same hard light creates incredible rim lighting, dramatic separation between subject and background, and punchy, high-contrast images that look absolutely stunning in black and white.
The key mental shift is this — stop trying to recreate soft, overcast light when the sun is screaming overhead. Instead, ask yourself: how do I use this light with intention?
Start by identifying the direction of your main light source. Walk around your subject and notice where shadows fall. A shadow falling directly below the nose at a 90-degree angle means you’re shooting under direct overhead sun — the worst position. But rotate your couple just 30 to 45 degrees so the sun hits them from a slight angle, and suddenly those shadows become sculpting tools.
The Sunny 16 Rule as Your Baseline
Before you even think about creative techniques, lock in your exposure using the classic Sunny 16 Rule: in direct sunlight, set your aperture to f/16 and your shutter speed to the reciprocal of your ISO. At ISO 100, that’s 1/100s at f/16. At ISO 400, that’s 1/400s at f/16. This gives you a reliable starting point that prevents blown highlights on that white dress — a mistake you cannot fix in post. From this baseline, you open up or close down depending on your creative intent.
Understanding the quality of light — not just the quantity — is the foundation everything else builds on. Hard light rewards confident, deliberate photographers. Start there.
2. Finding and Creating Shade: The Fastest Fix for Midday Portraits
The fastest way to solve harsh sunlight at a wedding is to move your subjects out of it entirely — into open shade that still offers beautiful, even, soft illumination.
Open shade is any area shaded from direct sunlight but still lit by the large, open sky above. Think: the shadow side of a building, under a tree canopy, inside a covered barn doorway, or beneath a pergola. This is different from closed shade, which blocks sky light from above and creates muddy, flat images. Open shade gives you a large, soft light source — essentially a massive natural softbox.
At real weddings, you need to scout this before the day. During your venue walkthrough, identify two or three open shade spots at different times of day. Note which direction they face. A north-facing shaded wall at noon is gold. A south-facing one might still bounce harsh reflections onto your subjects.
Using Buildings, Doorways, and Overhangs Creatively
Don’t just hide in shade — use it architecturally. Positioning the couple just inside a barn doorway or archway creates a natural vignette and frames them beautifully while the bright outdoor background adds depth and separation. Expose for the subjects’ faces (not the background) and let the exterior blow out slightly for a dreamy, editorial feel.
For camera settings in open shade: shoot at ISO 400–800, aperture f/1.8–f/2.8 for flattering depth of field on portraits, and shutter speed at 1/500s or faster if there’s any movement. White balance should be set to Shade (around 7500K) or a custom reading, because open shade skews cool-blue and warming it in-camera saves you time in Lightroom.
If no natural shade exists — yes, this happens at destination beach weddings — bring your own. A 5-in-1 reflector held by an assistant overhead acts as a mini diffusion panel. Some photographers carry a portable scrim or a translucent shoot-through umbrella for exactly these situations. It looks professional, it solves the problem, and your couple will thank you for it.
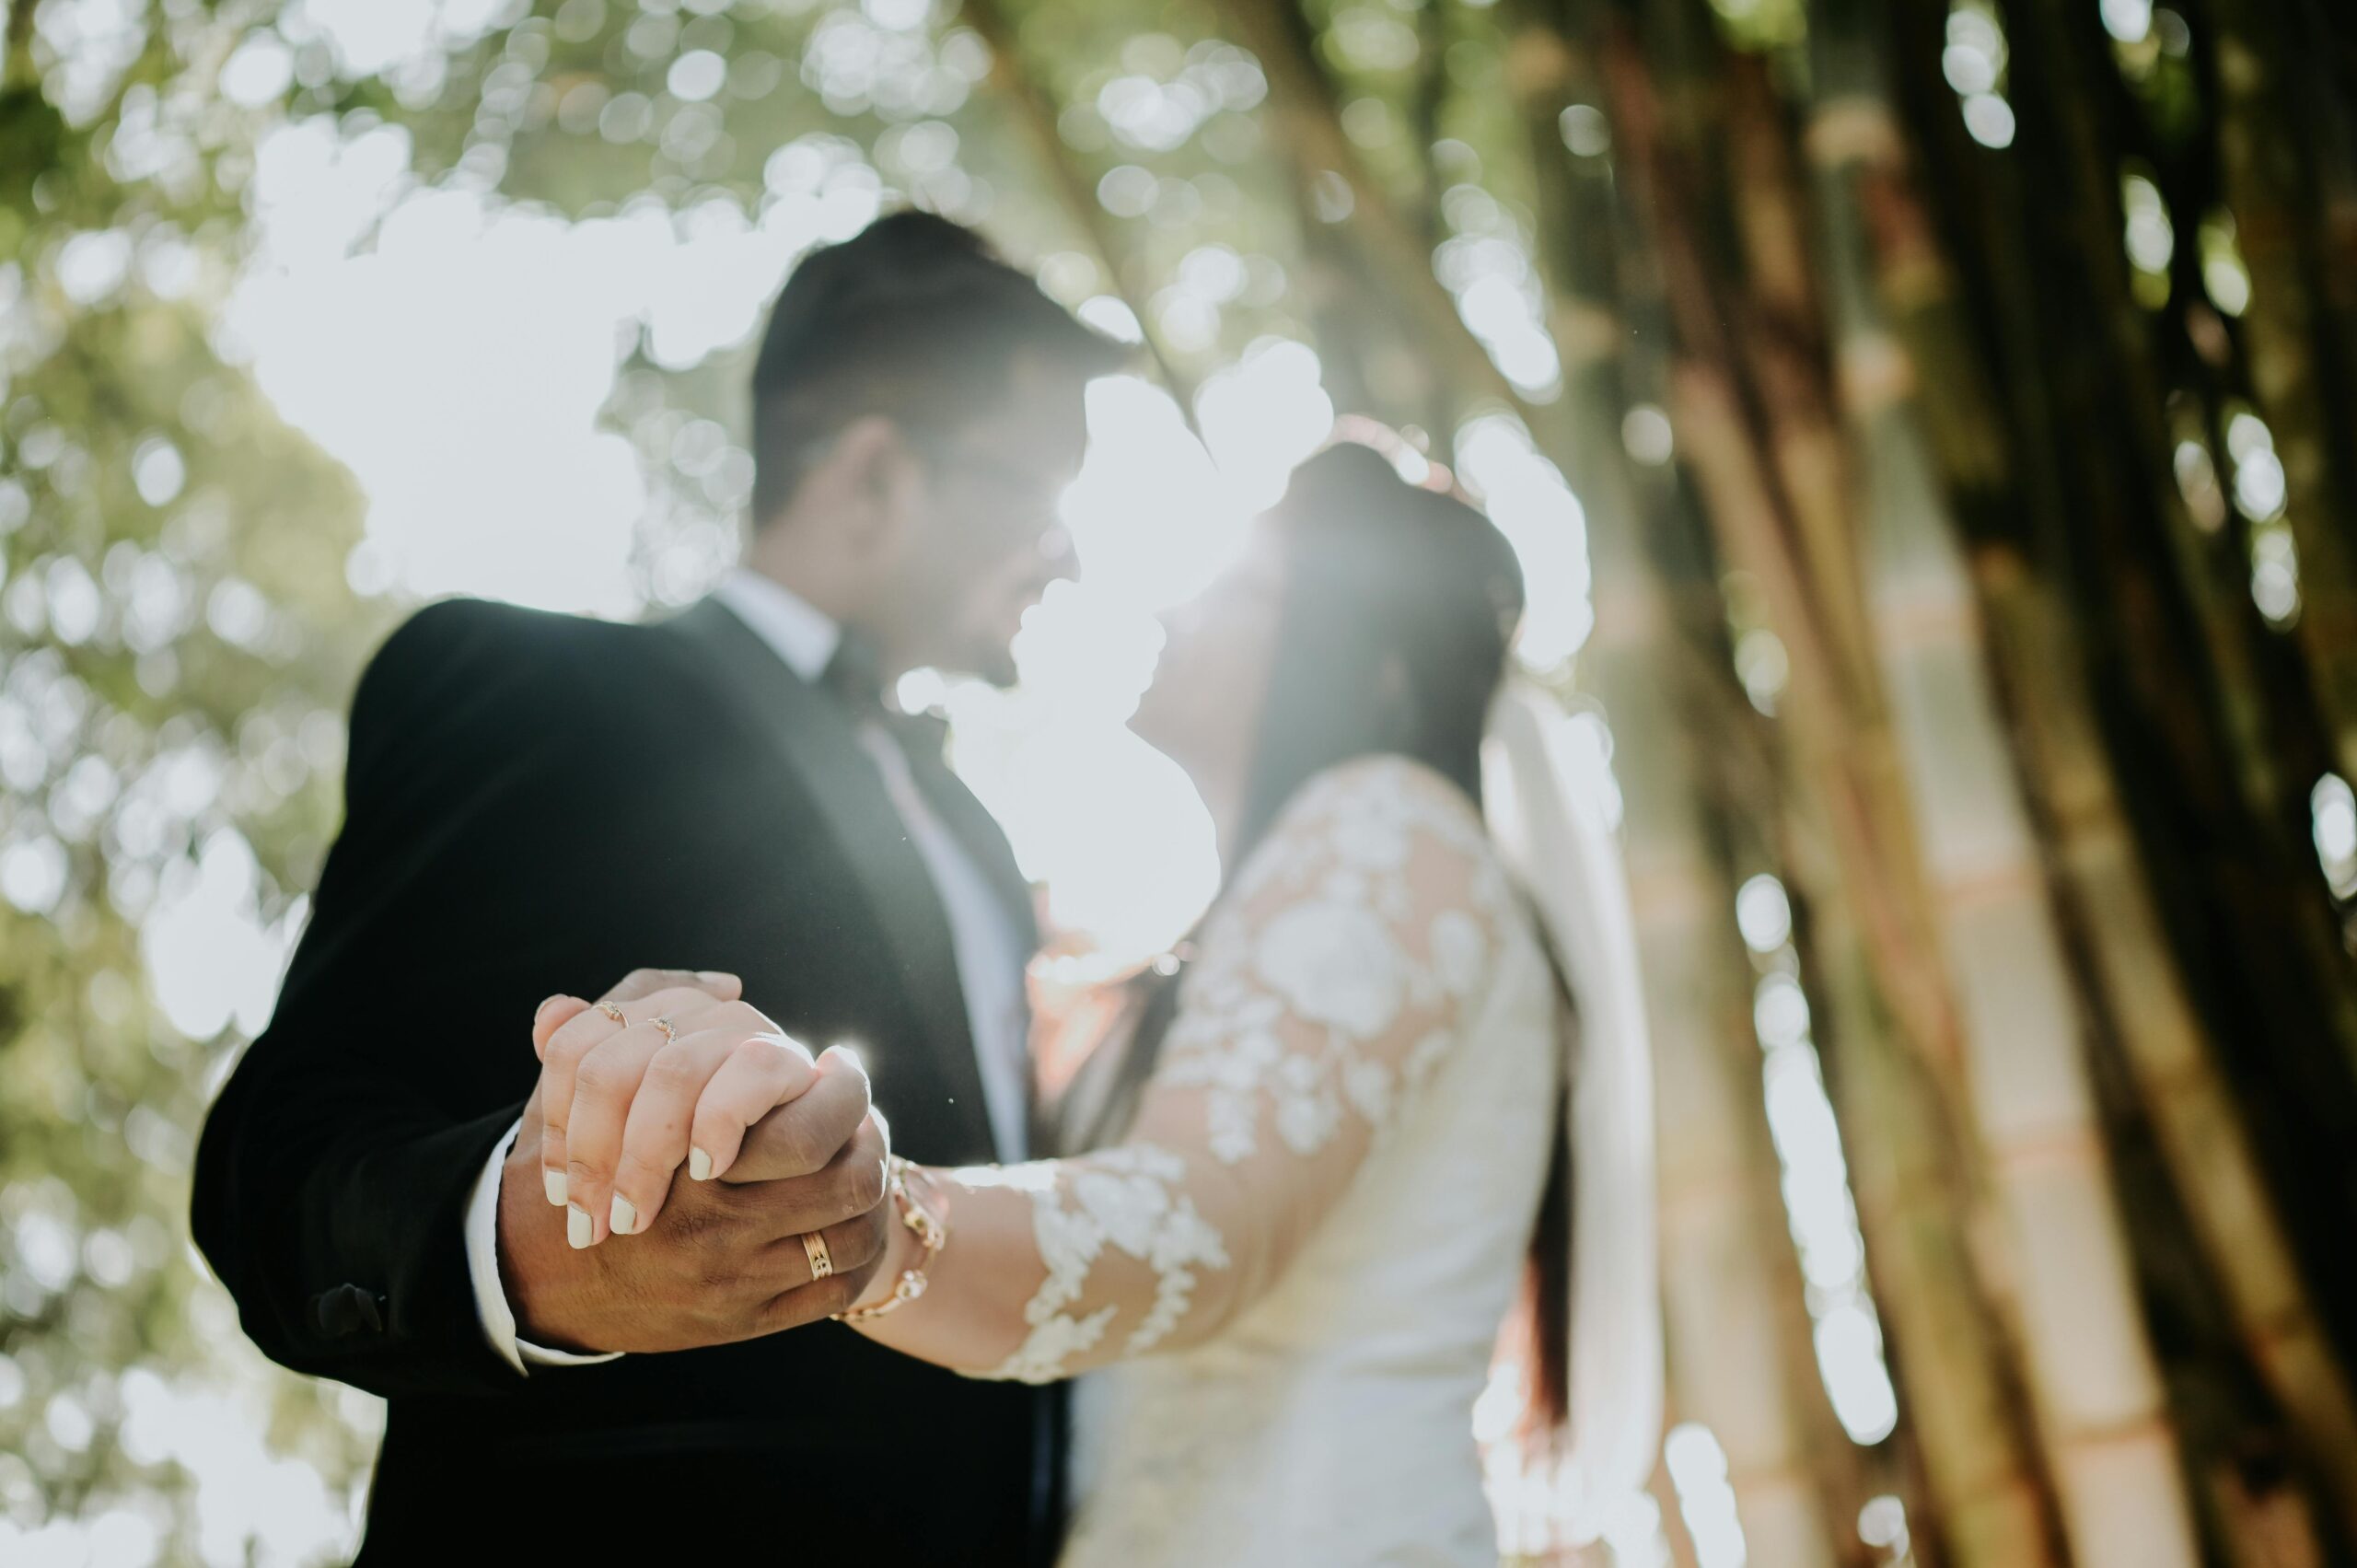
3. Mastering Backlight and Sun Flare for Wedding Photography in Harsh Sunlight
Backlight — placing the sun behind your subjects — is one of the most powerful techniques for shooting a wedding in harsh sunlight, turning a problem light source into a gorgeous, glowing rim light.
When you position the sun directly behind your couple, it creates a beautiful halo of light around their hair and shoulders, separating them from the background and giving images an ethereal, luminous quality. The challenge is exposure: your camera’s meter will try to expose for the bright background and underexpose your subjects’ faces.
The solution is to spot meter or use exposure compensation. Aim your meter at the subjects’ faces, lock exposure (AE-L button), recompose, and shoot. Alternatively, dial in +1.0 to +1.7 stops of positive exposure compensation when shooting in Aperture Priority mode. Yes, the sky behind them may blow out — that’s often fine and even desirable for a clean, airy look.
Controlling Lens Flare: Embrace It or Kill It
Lens flare in backlit conditions is a creative choice, not an accident. When the sun clips the edge of your frame, you get geometric flare patterns from your lens elements — hexagons or circles of light streaking across the image. Some photographers love this for its organic, film-like feel. Others hate it. Know which camp you’re in before the wedding day.
To embrace flare: remove your lens hood, shoot wide (f/1.8–f/2.8), and position the sun just outside the frame edge. Move slightly left or right to find where the flare becomes an artistic element rather than a distraction. To eliminate flare: use your lens hood, shoot at f/8 or smaller (diffraction creates a starburst instead), or have an assistant block the sun with a hand or card just outside the frame. A lens hood is the single cheapest piece of gear that gives you the most control over this.
Backlight also works brilliantly during those last 20 minutes before sunset — combining backlight technique with golden hour magic. The sun is lower, softer, and more orange, meaning rim light becomes warmer and more flattering. This is the sweet spot every wedding photographer lives for.
4. Using Flash and Reflectors to Balance Harsh Midday Sun
Ambient light alone won’t always save you at midday — sometimes you need to fight fire with fire by adding artificial or reflected light to fill in those harsh shadows.
Fill flash is the professional’s secret weapon for outdoor wedding portraits in direct sun. The goal isn’t to overpower the sun — it’s to reduce the contrast ratio between highlights and shadows to something the camera sensor can capture cleanly. A good starting point: set your flash to -1.3 to -1.7 EV below ambient exposure. This fills the shadows under eyes and chins without making the image look obviously lit.
Your camera’s sync speed matters here. Most DSLRs and mirrorless cameras sync flash up to 1/200s or 1/250s. In bright midday sun, you’ll often want a faster shutter to control ambient exposure — which means you need High-Speed Sync (HSS) enabled. HSS lets you shoot at 1/1000s or faster with flash, giving you full ambient control without sacrificing flash output.
Rear Curtain Sync and Creative Flash Techniques
For creative moments — like a couple’s first dance outdoors at dusk with ambient light fading — consider Rear Curtain Sync (also called Second Curtain Sync). This fires the flash at the end of the exposure rather than the beginning, which means any motion blur from ambient light trails behind the subject rather than in front of them. The result is a more natural-looking motion effect that feels intentional and cinematic.
If you prefer not to use flash, a collapsible reflector is your next best tool. A silver/white reflector bounces sunlight back into shadows when held at the right angle by an assistant. Position the reflector opposite the sun, angling it to catch direct sunlight and bounce it onto your subjects’ faces. Silver gives a brighter, cooler fill; white gives a softer, more neutral fill. Gold gives a warm, flattering fill that mimics golden hour even at noon — a technique popularized by many natural light wedding photographers who want warm tones without flash.
5. Golden Hour Wedding Photography: Timing, Positioning, and Camera Settings
Golden hour — the 30 to 60 minutes after sunrise and before sunset — is the most forgiving and magical light of the entire wedding day, and knowing exactly how to use it separates good wedding photos from iconic ones.
The light during golden hour is low, warm, and directional. It wraps around subjects softly because it’s traveling through more atmosphere, scattering the harsh blue wavelengths and leaving behind rich oranges, golds, and pinks. Shadows are long and gentle. Skin tones glow. Whites on a wedding dress pick up warm hues that no preset can fully replicate.
Timing is everything. Use an app like PhotoPills or The Photographer’s Ephemeris to know the exact minute of sunset at your venue. Plan your couple portraits to start 45 minutes before sunset. This gives you time for the warmer pre-golden hour light, the peak golden hour magic, and the softer blue-hour moments right after the sun drops.
Ideal Camera Settings for Golden Hour Portraits
For golden hour portraits, shoot in Aperture Priority or Manual mode. Start with: ISO 400–800 (increase as light fades), aperture f/1.8–f/2.8 for subject separation, and shutter speed at 1/500s to freeze any movement and prevent motion blur from hand-holding. As golden hour progresses toward sunset, light drops fast — sometimes a full stop every three minutes. Watch your histogram and bump ISO rather than opening aperture wider, to maintain depth of field on both faces in a couple shot.
White balance during golden hour: shoot in Kelvin manually at around 5500K–6000K for accurate tones, or set to Daylight and let the warmth render naturally. Avoid Auto White Balance (AWB) — it will try to neutralize those beautiful warm tones and give you a lifeless result in-camera preview. Shoot RAW so you have full control in post regardless, but getting your WB close in-camera helps you nail exposure and composition without second-guessing the preview.
Position your couple so the setting sun creates sidelight or backlight — not direct front light, which even at golden hour can be squint-inducing. Side lit golden hour images have incredible texture and depth. Backlit golden hour portraits are the ones that win awards.
6. Posing and Directing Couples in Bright Sunlight
Even perfect light control means nothing if your couple is squinting, stiff, or positioned poorly — posing in harsh sunlight requires specific adjustments that differ from overcast or studio conditions.
The first rule: never position your couple facing directly into harsh sun. This causes squinting, blown highlights on foreheads and noses, and uncomfortable subjects who aren’t relaxed enough to look natural. Instead, turn them 45 to 90 degrees away from the light source, or go full backlight as discussed. Their eyes stay relaxed, shadows fall at flattering angles, and you gain control over the dynamic range in your frame.
When you must shoot with sun overhead (ceremony coverage, for example, where you can’t move the light), instruct your subjects to tilt their chins slightly down. This brings the eye sockets slightly forward, reducing raccoon-eye shadows. It also elongates the neck and improves posture — two birds, one stone.
The “Turn Into the Light, Then Back Off” Technique
Here’s a practical posing technique for finding the sweet spot with directional sunlight: start by having your subjects face the sun fully so you can see where shadows fall on their faces. Then slowly rotate them away — 15 degrees at a time — while watching through your viewfinder. The moment shadows become sculpting rather than distracting, stop. This technique, used by photographers like those at Hunter & Sarah Photography, helps you find the optimal light angle for each unique face shape rather than applying a one-size-fits-all rule.
Also consider using natural light blockers as posing props. Have the bride hold her bouquet at chest level — it reflects light upward onto her chin and neck area, acting like a mini reflector. Have the couple stand on the shaded side of a tree, leaning against it or interacting with it. Use the tree itself to block overhead sun while the open sky provides even, flattering side light.
For movement-based poses in harsh light — walking, spinning, candid laughter — use a faster shutter speed (1/1000s or higher) and burst mode. The couple’s natural squinting from light becomes less obvious when they’re mid-laugh or turning away. Capture the motion and pick the frames where light falls best on their faces.
Frequently Asked Questions
What camera settings should I use for shooting a wedding in harsh sunlight?
Start with the Sunny 16 Rule: f/16, ISO 100, shutter at 1/100s as a baseline. For portraits, open to f/1.8–f/2.8, raise ISO to 400–800, and keep shutter at 1/500s or faster. Use High-Speed Sync if adding flash. Always shoot RAW for maximum highlight and shadow recovery in post-processing.
How do I prevent squinting in bright sunlight wedding photos?
Never position subjects facing direct sun. Turn them 45–90 degrees away, use backlight instead, or move into open shade. If you must shoot with sun in their eyeline, have subjects close their eyes, take a breath, and open them just before you shoot — this gives you relaxed, natural-looking eyes in the frame.
Is golden hour always better than midday for wedding photography?
Golden hour is generally more forgiving with warm, low, directional light that flatters skin tones and creates beautiful depth. However, midday sun handled with shade, fill flash, backlight, and correct posing can produce stunning results. Many editorial-style wedding photographers intentionally use harsh midday light for high-contrast, dramatic images.
Should I use flash for outdoor wedding portraits in sunlight?
Yes — fill flash at -1.3 to -1.7 EV below ambient exposure reduces contrast and fills harsh shadows without looking artificial. Enable High-Speed Sync (HSS) to use flash at shutter speeds above 1/250s in bright conditions. A reflector is a no-flash alternative that works well with an assistant available to hold and angle it.
How far in advance should I plan for golden hour at a wedding?
Use PhotoPills or The Photographer’s Ephemeris to find the exact sunset time months before the wedding. Communicate this to the couple and coordinator during planning. Aim to start couple portraits 45 minutes before sunset. Build this into the timeline so it’s protected — golden hour waits for no one.
What is the best lens for harsh sunlight wedding photography?
A 35mm or 50mm prime at f/1.8–f/2.0 gives you subject separation, low-light capability for fading golden hour, and manageable depth of field for two-person portraits. A 70–200mm f/2.8 is excellent for candid ceremony coverage from a distance where repositioning isn’t possible. Always use a lens hood to control flare.
Conclusion
Shooting a wedding in harsh sunlight isn’t about waiting for perfect conditions — it’s about building the skills to create beautiful images in whatever conditions you’re handed. From applying the Sunny 16 Rule to set a rock-solid exposure baseline, to using backlight and fill flash with High-Speed Sync, to timing your golden hour portraits with surgical precision using PhotoPills — every technique in this guide puts control back in your hands. The photographers who thrive in challenging light are the ones who’ve stopped apologizing for the sun and started using it with intention. Scout your venues, know your gear, communicate your timeline needs to coordinators, and show up ready to work with the light — not against it. Your couples hired you because they trust you. Now go prove that trust is well placed. If you found this guide useful, bookmark it before your next outdoor wedding and share it with a fellow shooter who needs it.